How to Play House of the Rising Sun - Folk Song Favorites
How to Play House of the Rising Sun - Folk Song Favorites Video Transcript and Lesson Examples
Hello, friends. Chris with BeginningGuitarOnline.com.
In this episode of "Folk Song Favorites," we're looking at that haunting and evocative piece of Americana called "House of the Rising Sun."
Many people know this song thanks to so many big-name artists doing a rendition of their own throughout the years. What most musicologists agree on is this piece was written by a woman about an establishment in New Orleans. However, we don't know who wrote it exactly, but it was penned sometime in the late 1800s or early 1900s.
Chord Changes for House of the Rising Sun
Not only is this song so fun to play, but it gives us a chance to work on the more complex development of chord changes. We're centered in the key of A minor, and we can really think of the song as having two sets of a chord progression.
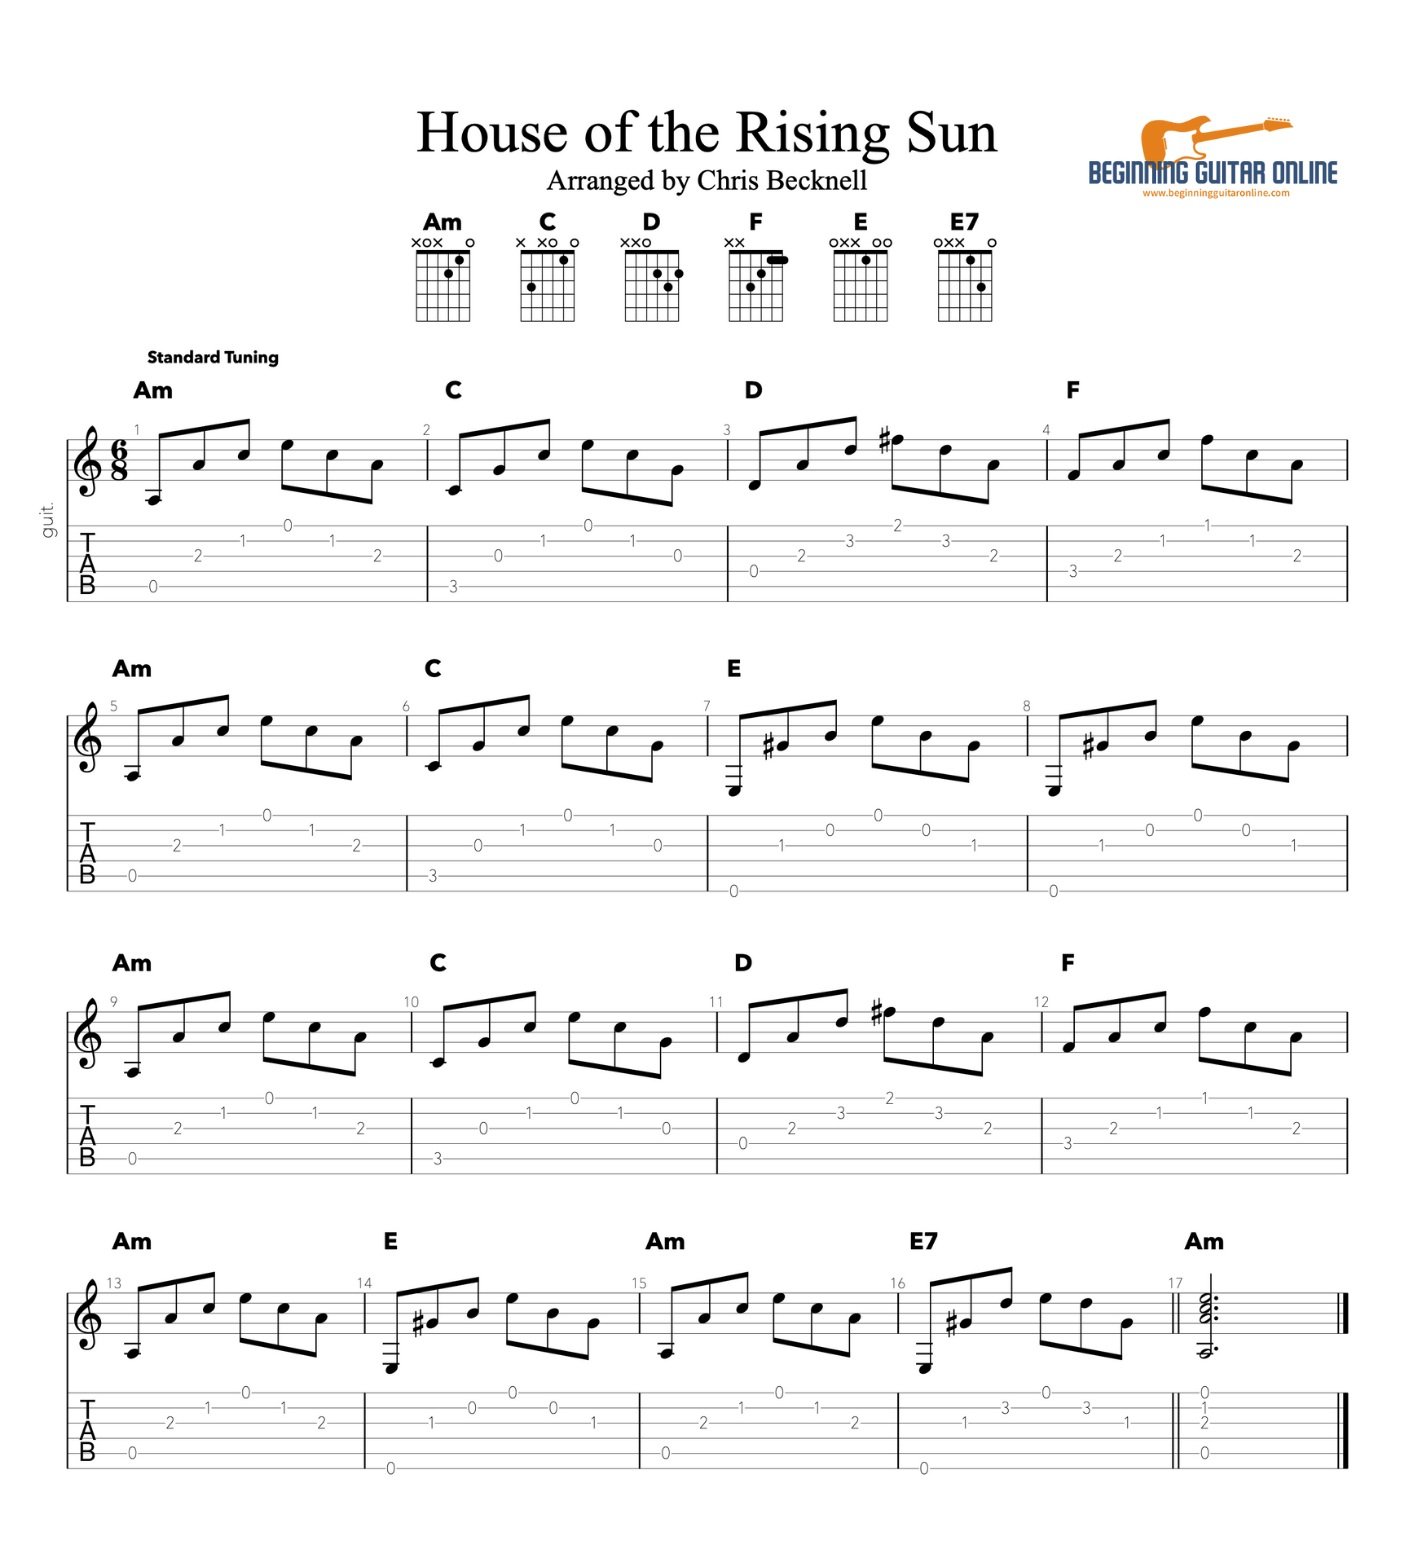
The first one is a little bit longer. A minor. C. D. F. A minor. C. E. And E again.
And then the second set is a little bit shorter but utilizes the same chords with the addition of an E7 chord at the end. The second set, A minor, C. D. F. A minor. E. A minor. Now E7. And then back to the top.
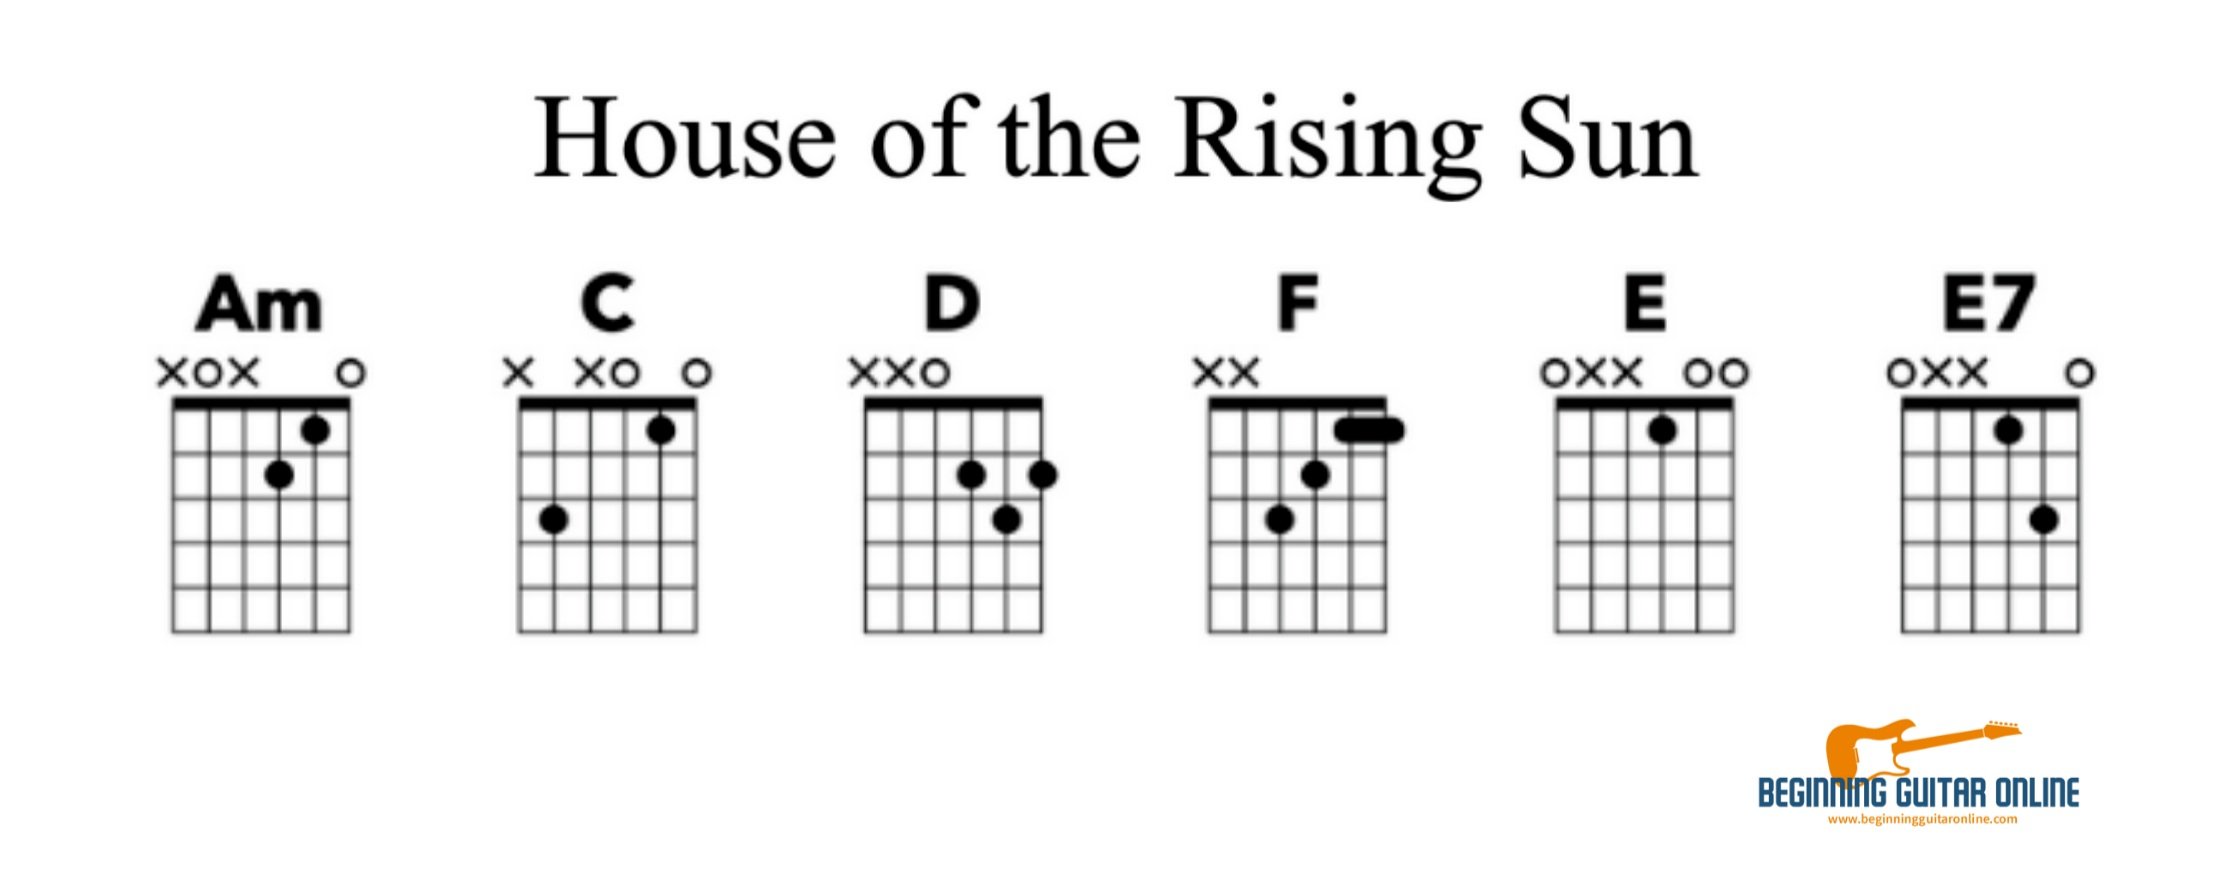
Here are all the chords you’ll need to get through this great piece.
So we've really got two sections to the chord progression there. Makes it quite fun to play. As we navigate through this, we'll be using finger-style guitar chords to play most of the chords. What I mean is, with our left hand, we're not needing to put down as many fingers per chord as we would if we were strumming this with a pick. By fingerpicking it, we're able to use chords that sometimes only involve one or two fingers in the left hand. Let's take a closer look at that.
By playing finger-style chords, we're able to play more minimal versions of the larger chords that we usually use when strumming with a pic. For A minor, I only need my index finger on C natural, and my second finger on the A. Then I'm playing the fifth string, third, second, and first.
For the C chord, all I need to do is continue to hold down the C natural with my index finger while adding a third finger, C in the base. You can put down the second finger E on the D string if it's comfortable for you, and you're used to doing so from playing a C chord in a strum pattern, but for a fingerstyle pattern, all we need are these two fingers.
Then a D chord will be the D chord we know and love with our first finger on the third string, A, second finger tucked on the F sharp, and our third finger on the second string third fret, D playing the top four strings. Four, three, two, one.
That brings us to our F chord. A big transition between these two. Third finger planting on the root, the F on the fourth string, second finger on the third string A, first finger on C natural and the first finger having to lay back a little bit in order to cover two notes at once.
I'm playing the C natural and the F natural on top, with the side of my first finger. As you get used to doing this, realize that it's really the side of the finger here that plays. You don't have to worry about getting the pad or the tip. Many people try to square their hand up a little too unnecessarily and apply pressure here without realizing that they can allow that small distal knucklebone to do the work of laying across two strings comfortably.
We place that little bar, add the A, and then the third finger, F, here. So we've got F, C natural, A, and our third finger, F, here. Once again, with the right hand plucking the top four strings. Then we're going back to our A minor chord.
We can just simply keep the second finger placed on the A, and the first finger just elevates a little bit to clear the E string. And we're back to the home base, A minor. Then that C chord again.
E. This one's a real joy to play finger style because we just have to keep the first finger down on the G sharp. All the other strings are open. Open six string, second string, and first string.
Once again, we're playing strings six, three, two, and one. Then back to an A minor. We're in the second half of the piece now, that second set of chords that we talked about at the beginning. C chord. Keep your first finger down on that C, don't lift it at all. D chord.
Transitioning to that F, trying to move as a group. ♪ [music] ♪ Back to the A minor. E. A minor. And then ending with an E7, which is our first finger G sharp, and then our pinky is going to play the third fret D on the second string, which is the seventh of the chord. Gives it that sense of pull and urgency to return to tonic, which is A minor. And the progression begins again.
Right-Hand Picking Technique for House of the Rising Sun
As we take a closer look at the skills needed in the right hand and the left hand for playing this piece, it's important to point out that with our picking hand, we're assigning the index finger to the third string, the middle finger to the second string, and the ring finger to the first string.
These fingers will never leave these strings. They're kind of set on a home base for the entire piece. Only our thumb will traverse between the bottom three strings in order to cover the changing base notes as needed.
A minor. C. D. The right-hand stays on the same strings. Back to A minor. C. E. E again.
A minor. C. D. F. A minor. E. A minor. E7.
And our right-hand fingers play the same strings they did for the E chord. Then we're back to the beginning of the progression.
Putting It All Together
Now that you've had a chance to see those chords up close, let's play through it together in a slow, rhythmic way. We'll take three beats of rest in between each chord change to get our fingers in place. A minor starts. One, two, three, ready and play.
C, two, three. D, two three. F, two, three. A minor, two, three. C, two, three. E, two, three. E again.
A minor. C, two, three. D, two, three. F, two, three. A minor, two, three. ♪ [music] ♪ E, two, three. A minor, two, three. E7, two, three. Then we're back to the head.
Now that you've had a chance to go through that a couple of times on your own, let's go through it together without any rhythmic pauses between the chord changes. Smooth chord changes all around. I'll still announce each chord as we arrive at it.
A minor begins, one, two, three, ready and play. C. D. F. A minor. C. E. E again.
A minor. C. D. F. A minor. E. A minor. E7. And then back to the head.
Have fun playing along with these chord progressions. Once you're feeling really comfortable with those, try singing along.
As always, thanks for watching. If you're interested in other videos and other educational resources, check out our website BeginningGuitarOnline.com, and sign up for our "Woodshed" newsletter. We deliver educational content right to your inbox and you'll never miss another video. Click Subscribe if you haven't already, and thanks for watching.